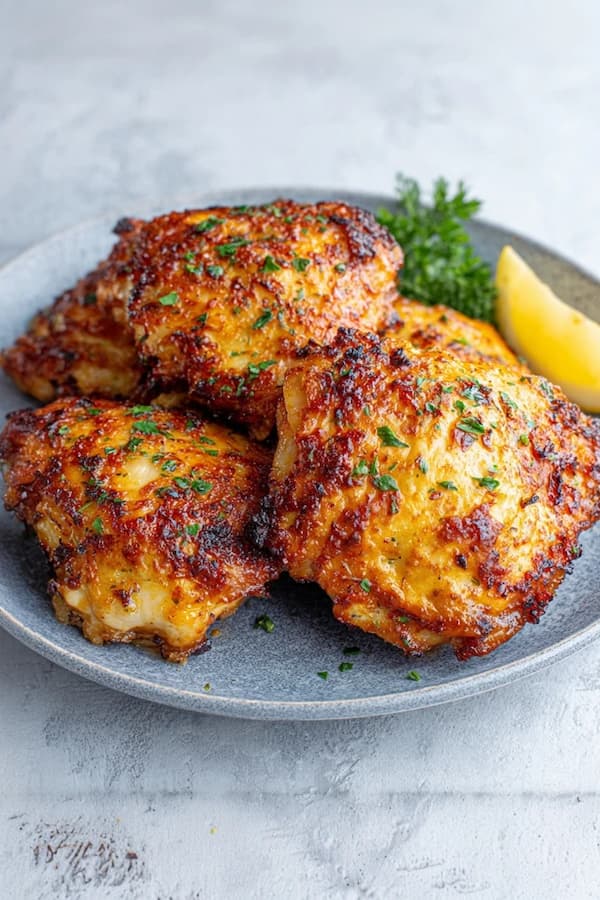
Air fryer chicken thighs are the ultimate solution for anyone who wants crispy skin and juicy meat without standing over a stove.
Unlike breasts, thighs have enough natural fat to stay tender even if you cook them a few minutes too long. It is a reliable, hands-off method that produces a result very similar to deep frying but with much less effort.
Ingredients
This recipe makes 4 servings, allowing for one large thigh per person or two smaller ones.
- 4 to 6 bone-in, skin-on chicken thighs
- 1 tablespoon avocado oil or olive oil
- 1 teaspoon sea salt
- 1/2 teaspoon cracked black pepper
- 1 teaspoon garlic powder
- 1 teaspoon smoked paprika
- 1/2 teaspoon dried thyme
- 1/4 teaspoon cayenne pepper (optional)
The Dark
Chicken thighs are often called “the cook’s favorite” because they are nearly impossible to ruin. Dark meat has more connective tissue and fat than white meat, which means it stays succulent under the intense heat of an air fryer. While a chicken breast can turn into dry cardboard in ten minutes, a thigh just gets better as the fat renders out and the skin tightens.
Using the air fryer for this specific cut is a game-changer because of the way the air circulates. In a traditional oven, the bottom of the thigh often sits in its own juices and stays soggy.
In the air fryer, the hot air hits the meat from every angle, drying out the skin until it sounds like a cracker when you bite into it. It is the most efficient way to get that “fried” texture at home.
Dry Surface
Start by taking your chicken out of the package and patting it dry with paper towels. Do not skip this part. If the skin is wet, the air fryer will spend the first five minutes steaming the moisture away instead of crisping the fat.
You want the skin to be as bone-dry as possible before you add any oil or spices. This is the secret to getting that professional, high-end crunch.
Oil Coating
Place the dry thighs in a large bowl and drizzle with your chosen oil. Avocado oil is great because it can handle high heat without smoking, but olive oil works well too.
Use your hands to rub the oil over every inch of the chicken, including under the skin if you can. This thin layer of oil helps the heat penetrate the skin and ensures your spices stay exactly where you put them.
Spice Rub
In a small ramekin, mix your salt, pepper, garlic powder, paprika, thyme, and cayenne. Sprinkle the mix over the chicken. I like to start with the bottom side first, then flip them over and do the skin side last.
This ensures that the most important part—the skin—has a heavy, even coating of seasoning. The paprika adds a nice smoky depth and helps the chicken take on a deep mahogany color.
Skin Up
Preheat your air fryer to 380°F for three minutes. Once hot, place the thighs in the basket with the skin side facing up. Do not crowd the basket; the air needs to flow between the pieces to work its magic. If you are making a large batch, it is better to cook in two rounds.
The skin stays up the whole time so it gets the most direct contact with the heating element located at the top of the machine.
Heat Cycle
Set the timer for 18 to 22 minutes. You do not actually need to flip chicken thighs if you are using skin-on meat, as the skin needs that uninterrupted heat to get truly crispy. At the 15-minute mark, pull the basket out just to check on things.
If the skin is already very dark, you can turn the heat down to 360°F for the final few minutes to make sure the meat finishes cooking without burning the top.
The Rest
When the timer goes off, use a meat thermometer to check the internal temperature. For thighs, I actually prefer taking them to 175°F or even 180°F. While 165°F is the “safe” number, dark meat has a better texture when cooked slightly higher.
Move the chicken to a wooden board and let it sit for five minutes. This lets the fibers relax so the juices don’t spray out when you take your first bite.
Better Crunch
If you want the skin to be even louder when you bite it, you can add a tiny bit of baking powder to your spice rub. Just half a teaspoon for the whole batch will do.
Baking powder changes the pH level of the skin, which helps it break down and form tiny bubbles. Those bubbles turn into a shatteringly crisp texture that stays crunchy for a long time.
Another tip is to let the seasoned chicken sit uncovered in the fridge for an hour before cooking. This “air-chills” the skin even further. Most high-end restaurants use this technique with roast chicken to ensure the skin is paper-thin and crisp. If you have the time, it is a small step that elevates the dish from a simple weeknight meal to something special.
Common Pitfalls
The biggest mistake is using boneless, skinless thighs for this specific method. While they will still be juicy, you lose the protection and the flavor of the skin. If you do use skinless thighs, you should reduce the cooking time to about 12 to 14 minutes so they don’t dry out. Always adjust your timing based on the thickness of the meat.
Another issue is putting the chicken into a cold air fryer. Just like a pan, the basket needs to be hot so the fat starts rendering immediately. If the chicken warms up slowly, the skin can become rubbery instead of crisp. Always give your machine a few minutes to get up to temperature before you load it up.
Why Is There Smoke Coming From My Air Fryer?
Smoke usually happens when the fat from the chicken thighs drips onto the bottom of the air fryer and starts to burn. This is common with dark meat because it is so fatty. To stop this, you can place a single slice of bread in the bottom of the air fryer (under the basket) to soak up the grease.
Alternatively, you can put a tablespoon of water in the bottom tray to keep the drippings cool so they don’t reach their smoke point.
Can I Use Frozen Thighs For This Recipe?
You can, but the results won’t be quite as “top-notch” because you can’t get the skin dry enough for a perfect crunch. If you must cook from frozen, air fry them at 350°F for 10 minutes to thaw them out.
Then, take them out, pat them dry, add your oil and spices, and finish cooking at 380°F for another 15 to 20 minutes. It is always better to thaw them in the fridge overnight if you want the best possible texture.