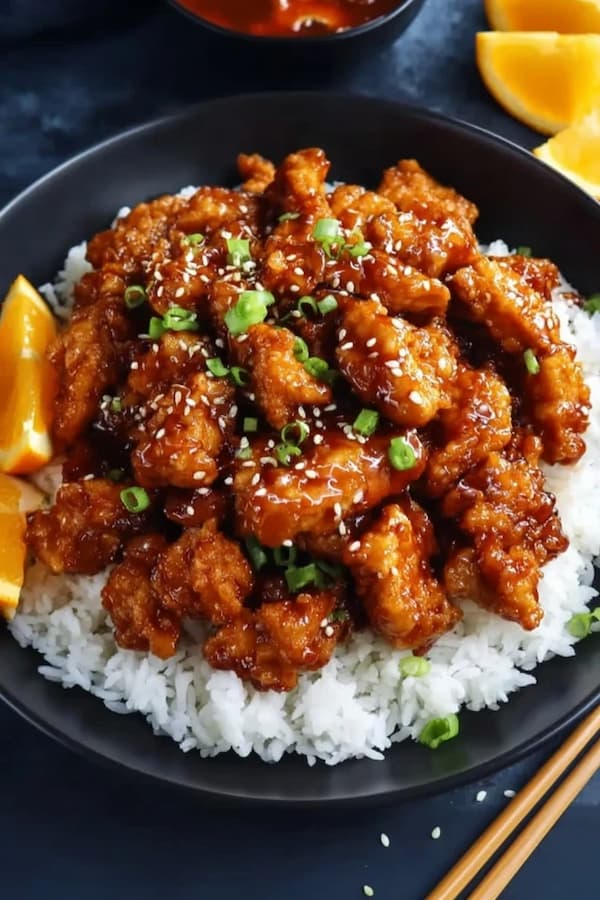
Making orange chicken at home is much easier than most people think, and it tastes better than the version from the local mall. This recipe focuses on getting a very crispy coating on the meat that stays crunchy even after you toss it in the sweet and zesty glaze.
It is the perfect weekend meal for when you want something satisfying that the whole family will love.
Ingredients
This recipe makes 4 servings, which is enough for a standard family dinner when served over a bowl of steamed rice.
- 1.5 pounds boneless skinless chicken thighs, cut into bite-sized pieces
- 1.5 cups cornstarch
- 2 large eggs, beaten
- 1/2 cup vegetable oil (for shallow frying)
- 1 cup orange juice (freshly squeezed is best)
- 1/2 cup granulated white sugar
- 2 tablespoons rice vinegar
- 2 tablespoons soy sauce
- 1/2 teaspoon ginger powder
- 1/2 teaspoon garlic powder
- 1/2 teaspoon red chili flakes (optional)
- 1 tablespoon orange zest
- 1 tablespoon cornstarch mixed with 1 tablespoon water (for the slurry)
- Green onions and sesame seeds for garnish
The Concept
The goal of a great orange chicken is balance. You want the sauce to be thick enough to coat the back of a spoon, but not so thick that it becomes gummy. The citrus flavor should be bright and sharp, which is why we use both the juice and the zest of the orange.
Using chicken thighs instead of breasts is a smart move here because the dark meat stays juicy during the frying process, whereas breast meat can dry out quickly.
To get the look seen in the second image you shared, the key is the cornstarch coating. Unlike a flour batter, cornstarch creates a very thin, glass-like crust that shatters when you bite into it.
When this crust meets the warm orange glaze, it absorbs the flavor without losing its structural integrity. It is a simple technique that yields a professional result every time you step into the kitchen.
The Prep
Start by cutting your chicken into even, one-inch cubes. If the pieces are all the same size, they will cook at the same rate, which prevents some pieces from being overdone while others are still raw.
Pat the chicken dry with a paper towel before you start the coating process. Moisture is the enemy of a good fry, so getting the surface of the meat dry ensures the egg and cornstarch stick perfectly.
Double Dip
Set up two bowls: one with your beaten eggs and one with the 1.5 cups of cornstarch. Dip each piece of chicken into the egg first, shaking off any excess, and then drop it into the cornstarch. Press the starch into the meat with your fingers to make sure every nook and cranny is covered.
Lay the coated pieces on a wire rack for about five minutes. This short rest helps the coating “set” so it doesn’t fall off in the hot oil.
The Sear
Heat your vegetable oil in a large skillet over medium-high heat. You don’t need to deep fry these; a shallow fry with about half an inch of oil is plenty. Place the chicken pieces in the hot oil, making sure they are not touching.
If you crowd the pan, the temperature of the oil will drop, and the chicken will become greasy instead of crispy. Fry for about 3 to 4 minutes per side until they are a deep golden brown.
Sauce Base
While the chicken is resting on paper towels to drain, start the sauce in a separate small saucepan. Combine the orange juice, sugar, vinegar, soy sauce, ginger, garlic, and chili flakes. Bring the mixture to a simmer over medium heat.
You want the sugar to dissolve completely. Taste the sauce at this point; if you want it more tart, add a splash more vinegar. If you want it sweeter, add a teaspoon of sugar.
Thick Glaze
Once the sauce is simmering, give your cornstarch and water slurry a quick stir and pour it into the pan. Whisk constantly as the sauce thickens.
Within about a minute, the liquid will turn from a dull orange to a shiny, translucent glaze. This is the moment to add your orange zest. Adding the zest at the end preserves the fresh oils and ensures the orange scent is very strong when you serve the dish.
The Toss
Put all your crispy chicken pieces into a large mixing bowl. Pour the hot orange glaze over the top. Use a large spoon or a pair of tongs to toss the chicken quickly until every piece is glowing with the sauce.
Do this right before you are ready to eat. If you let the chicken sit in the sauce for twenty minutes, the steam will eventually soften the crust, and you will lose that signature crunch.
Better Citrus
For a “top-notch” flavor, I highly recommend using a fresh orange rather than just a carton of juice. The zest—the very outer orange layer of the skin—contains the most concentrated flavor. When you grate the zest directly into the sauce, you get a punch of citrus that a bottled juice simply cannot provide. It makes the dish taste fresh and homemade rather than like something from a frozen bag.
If you like a bit of heat, don’t be afraid to double the red chili flakes. The heat of the pepper works perfectly with the sugar in the glaze, creating a “sweet and spicy” profile that is very addictive. You can also add a teaspoon of toasted sesame oil to the sauce at the very end for a nutty aroma that rounds out the sharp vinegar and sweet juice.
Common Pitfalls
The biggest mistake people make with orange chicken is using a pan that isn’t hot enough. If the oil is lukewarm, the cornstarch coating will just soak up the fat and turn into a soggy paste.
Always test the oil with a small piece of bread or a drop of batter; it should sizzle immediately. If it doesn’t, wait another minute before adding your chicken.
Another issue is the sauce consistency. If your sauce is too thin, it will run off the chicken and collect at the bottom of the bowl. If it is too thick, it will be hard to distribute evenly. The cornstarch slurry is powerful, so add it slowly.
You can always add more to thicken it up, but it is much harder to thin a sauce out without diluting the flavor.
Can I Use An Air Fryer For This Recipe?
Yes, you can definitely make a lighter version of this using an air fryer. Instead of shallow frying in a skillet, spray your cornstarch-coated chicken pieces with a generous amount of oil spray. Place them in the air fryer basket at 400°F for about 12 to 15 minutes, shaking the basket halfway through.
While the texture will be slightly different than the traditional fried version, it will still be very crispy and hold the sauce well. Just make sure the pieces don’t touch so the air can circulate.
How Do I Store And Reheat Leftovers?
Orange chicken is best eaten fresh, but leftovers will stay good in the fridge for about three days. To reheat them, avoid the microwave, as it will make the breading very soft and soggy. The best way to regain the crunch is to put the chicken back into a hot air fryer or an oven at 375°F for about 5 to 7 minutes.
This will dry out the glaze and crisp up the coating again. It won’t be exactly like day one, but it will be much better than a microwave version.
Final Thoughts
This orange chicken recipe is a great example of how a few simple pantry staples can create a meal that looks like it came from a professional kitchen.
By focusing on the cornstarch coating and the fresh orange zest, you elevate a basic chicken dinner into something special. It is a fun, vibrant dish that is just as good for a casual Tuesday as it is for a Saturday night with friends.
Take your time with the frying, don’t forget to zest your orange, and make sure to serve it with plenty of green onions on top for a fresh finish. Once you see how much better the homemade version is, you might find yourself skipping the takeout menu for good.
Meta Description
Ditch the takeout with this better-than-the-mall orange chicken. Learn the secret to a shatteringly crispy cornstarch coating and a bright, zesty sauce made with fresh orange zest.