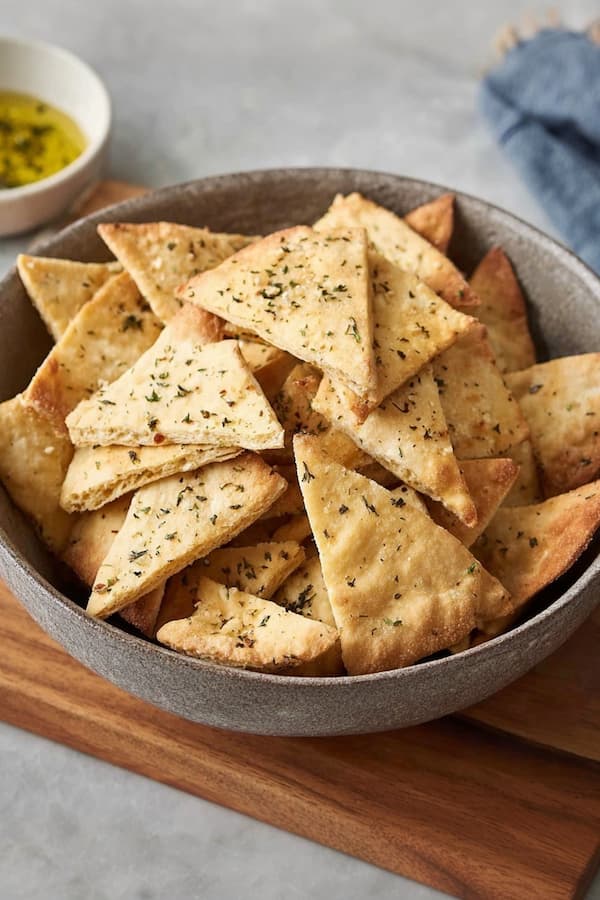
Pita chips are one of those basic snacks that everyone should know how to make at home. Once you realize how easy it is to turn a plain pocket of bread into a crunchy, golden treasure, you will never buy the bagged version again.
This recipe is simple, reliable, and uses basic pantry staples to create a side dish that pairs perfectly with your favorite dips.
Ingredients
This recipe makes 4 generous servings, which is perfect for a small gathering or to have on hand for a week of snacking.
- 4 large pita bread pockets (white or whole wheat)
- 1/4 cup extra-virgin olive oil
- 1 teaspoon sea salt
- 1/2 teaspoon garlic powder
- 1/2 teaspoon dried oregano or parsley
- 1/4 teaspoon black pepper
The Bread
A top-notch pita chip starts with the right foundation. You want to look for standard pita pockets rather than the thick, fluffy Greek-style flatbreads. The pocket style is thinner, which allows the chip to become incredibly crisp without being too hard on your teeth.
When you slice them open, you essentially get two thin sheets of bread, which doubles your snack output and ensures every piece is light and airy.
The beauty of using plain pita is that it acts like a sponge for the oil and seasonings. You can use white pita for a classic, mild flavor that kids love, or whole wheat for a nuttier, more rustic taste. If your pita is a day or two old, that is actually even better.
Slightly stale bread dries out faster in the oven, leading to a superior crunch that holds up against heavy dips like hummus or spinach artichoke dip.
Slice Work
Start by preheating your oven to 375 degrees Fahrenheit. While the oven warms up, take your pita pockets and cut them into triangles. The easiest way to do this is to use a sharp knife or kitchen shears to cut the circle into eight equal wedges, much like a pizza.
For an even thinner chip, you can carefully peel the top and bottom layers of each triangle apart. This gives you sixteen chips per pita instead of eight.
Oil Blend
In a small bowl, whisk together your extra-virgin olive oil, sea salt, garlic powder, dried oregano, and black pepper. You want a consistent mixture so that every chip gets an equal amount of flavor.
Don’t be afraid to be generous with the garlic; as it roasts in the oven, the sharp edge of the garlic mellows out into a savory, toasted sweetness that is absolutely addictive.
Tray Prep
Line a large baking sheet with parchment paper to prevent sticking and make cleanup easier. Lay your pita triangles out in a single layer. It is vital that they do not overlap.
If the chips are touching or piled on top of each other, they will steam instead of roast, leaving you with soft, chewy bread instead of the crisp chips you see in the provided image.
Brush Time
Use a pastry brush to coat the top of each triangle with your oil mixture. You don’t need to soak them; a light, even coating is enough to conduct the heat and help the spices stick.
If you don’t have a pastry brush, you can toss the triangles in a large bowl with the oil before laying them on the tray, but the brush method ensures a more professional, even finish without breaking the delicate bread.
Hot Bake
Slide the tray into the center rack of your oven. Bake them for about 10 to 12 minutes. Around the eight-minute mark, check on them. Ovens vary, and these can go from golden to burnt very quickly.
You are looking for a deep tan color and edges that are starting to curl up slightly. The chips should feel firm to the touch even while they are still hot.
Cool Down
Remove the tray from the oven and let the chips rest on the baking sheet for at least five minutes. This is a critical step because the chips will actually continue to crisp up as they cool.
If you eat them right away, they might still have a bit of a bread-like chew. Give them time to set, and you will be rewarded with that signature snap.
Better Flavor
To get a “top-notch” result, you can experiment with the spices. While garlic and oregano are classic, you can easily change the profile. For a Mediterranean twist, use a generous sprinkle of Za’atar. If you want something spicy, add a pinch of cayenne pepper or smoked paprika to your oil blend.
The heat from the paprika pairs beautifully with the earthy notes of the olive oil.
Another trick is to use a high-quality finishing salt. Instead of regular table salt, use flaky sea salt. Those larger flakes don’t just add a burst of saltiness; they provide a great visual appeal and an extra bit of texture.
If you are serving these with a sweet dip, like a fruit salsa, you can even swap the savory spices for cinnamon and sugar.
Common Pitfalls
The biggest mistake is crowding the pan. I know it is tempting to fit all your bread onto one tray, but if the triangles are too close, they won’t get that “fried” texture from the oven. If you have a lot of pita to process, work in batches or use two separate baking sheets on different racks. Air circulation is the key to a successful chip.
Another issue is the oil quantity. If you use too much oil, the chips will feel greasy and heavy. If you use too little, the spices will fall off and the bread will just taste dry. Aim for a glistening surface that looks wet but isn’t dripping. A light, golden sheen is your visual cue for the perfect amount of fat.
Can I Store These Chips Long Term?
Homemade pita chips are best eaten the day they are made, but they can be stored in an airtight container or a zip-top bag for up to five days. The main enemy of a pita chip is moisture. If they start to lose their crunch, you can easily revive them.
Just toss them back onto a baking sheet and pop them in a 350-degree oven for three or four minutes. This will draw out any moisture they absorbed from the air and make them snap like new again.
What Are The Best Dips For These Chips?
Because these chips are sturdy and savory, they work with almost any dip. Hummus is the traditional choice, as the chickpeas and olive oil complement the bread perfectly. They are also excellent with Tzatziki, where the cool cucumber and yogurt provide a refreshing contrast to the warm, toasted garlic.
If you want something more substantial, use them as a base for “Pita Nachos” by topping them with feta cheese, olives, and diced tomatoes and placing them under the broiler for a minute.
Final Thoughts
Pita chips are the ultimate DIY snack. They are faster than a trip to the store and far more flavorful because you can control exactly what goes on them. By using fresh oil and hand-slicing your bread, you create a rustic, high-quality appetizer that feels far more special than anything you can buy in a box.
Keep your triangles separated, your oven hot, and your spices bold. These simple rules are the foundation of a top-notch pita chip. Whether you are hosting a party or just need a crunchy snack for a movie, these chips will never let you down.
Would you like me to show you how to make a “Creamy Roasted Garlic Hummus” to dip these in, or would you prefer a recipe for “Cinnamon Sugar Pita Crisps” for a sweet alternative?
Short Meta Description
Ditch the store-bought bags for these top-notch homemade pita chips. Golden, garlic-infused, and perfectly crunchy, they are the ultimate companion for dips.