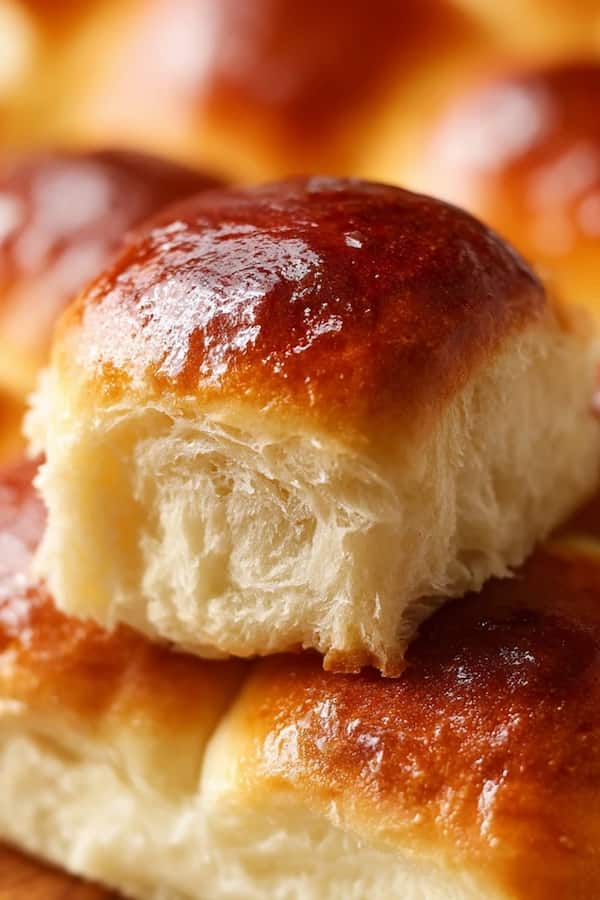
Homemade Hawaiian rolls are famous for their cloud-like texture and a unique sweetness that makes them impossible to stop eating. These rolls use pineapple juice and honey to create a tropical flavor that pairs perfectly with salty sliders or a simple pat of butter.
Making them at home ensures they are fresh, fluffy, and free from the preservatives found in store-bought bags.
Ingredients
This recipe makes 12 large rolls, which is the perfect amount for a family dinner or a tray of party sliders.
- 1/2 cup pineapple juice (warmed to 110°F)
- 1/2 cup whole milk (warmed to 110°F)
- 1 packet (2 1/4 tsp) active dry yeast
- 1/4 cup honey
- 1/4 cup unsalted butter, melted and cooled
- 1 large egg, room temperature
- 1 teaspoon vanilla extract
- 3 1/2 to 4 cups all-purpose flour
- 1 teaspoon sea salt
- 1 tablespoon melted butter (for brushing after baking)
Yeast Bloom
A top-notch Hawaiian roll starts with a healthy yeast bloom. In a large bowl or the bowl of a stand mixer, combine your warmed pineapple juice and whole milk. The temperature is very important; it should feel like warm bath water. If the liquid is too hot, it will kill the yeast, and if it is too cold, the dough will not rise.
Whisk in the honey and the yeast. Let the mixture sit for about ten minutes until it becomes foamy and smells like fresh bread. This foam is proof that your yeast is alive and ready to work.
Once you see that bubbling layer on top, whisk in your melted butter, egg, and vanilla extract. The vanilla is a professional baker’s secret that enhances the floral sweetness of the pineapple juice.
Flour Fold
Start adding your flour one cup at a time, along with the sea salt. If you are using a stand mixer, use the dough hook attachment on a low speed. If you are mixing by hand, use a sturdy wooden spoon.
You want to add just enough flour so that the dough pulls away from the sides of the bowl. It should still feel slightly tacky to the touch but not so sticky that it clings to your fingers.
Using too much flour is a common mistake that leads to heavy, dense rolls. For a light and airy result, keep the dough as soft as possible. Once the dough has formed a ball, knead it for about five to seven minutes. If the dough springs back when you poke it with a finger, you know the gluten has developed correctly.
This structure is what allows the rolls to hold all those tiny air bubbles.
First Rise
Lightly grease a large bowl with oil or cooking spray. Place your dough ball inside and turn it over once so the top is coated in oil. Cover the bowl with a clean kitchen towel or plastic wrap. Place the bowl in a warm, draft-free spot in your kitchen.
You need to let the dough rise until it has doubled in size, which usually takes about sixty to ninety minutes.
This first rise is where the flavor develops. The yeast consumes the sugars in the honey and pineapple juice, releasing gases that puff up the dough.
Be patient during this stage. If your kitchen is cold, you can place the bowl inside an oven that is turned off but has the oven light switched on. The small amount of heat from the bulb is often enough to keep the yeast happy.
Roll Shape
Once the dough has doubled, gently punch it down to release the air. Turn it out onto a lightly floured surface.
Use a knife or a bench scraper to divide the dough into twelve equal pieces. To make them look like professional blog rolls, weigh each piece on a kitchen scale to ensure they are the exact same size. This helps them bake evenly in the oven.
To shape each roll, tuck the edges of a dough piece underneath itself to create a smooth top. Roll the dough in a circular motion under the palm of your hand against the counter.
This creates tension on the surface of the dough, which helps the rolls rise upward rather than outward. Place the shaped rolls into a greased 9×13 inch baking pan, arranged in three rows of four.
Second Rise
Cover the baking pan again and let the rolls rise for a second time. This stage is shorter, usually taking about forty-five to sixty minutes. You want the rolls to expand until they are touching each other and look very puffy.
This secondary rise is what creates that “pull-apart” texture that defines a classic Hawaiian roll.
While the rolls are rising, preheat your oven to 350°F. Ensuring the oven is fully up to temperature before the rolls go in is vital for a good “oven spring.” This is the final burst of growth the dough gets when it first hits the heat.
If the oven is too cold, the rolls will be flat and may have a tough crust.
Golden Bake
Slide the pan into the center rack of the oven. Bake the rolls for 20 to 25 minutes. You are looking for a deep golden brown color on the tops. Because of the sugar in the pineapple juice and honey, these rolls brown faster than standard white bread.
If they seem to be getting too dark too quickly, you can loosely tent a piece of aluminum foil over the top for the last five minutes.
As soon as you pull the pan out of the oven, brush the tops of the hot rolls with a tablespoon of melted butter. This keeps the crust soft and gives the rolls a beautiful, glossy sheen. Let the rolls cool in the pan for at least ten minutes.
This allows the internal structure to set so they don’t collapse when you pull them apart.
Better Flavor
To get a “top-notch” result, use high-quality pineapple juice. If you use juice from a can of pineapple chunks, make sure it is 100% juice and not heavy syrup. The acidity in the juice helps break down the flour proteins, resulting in a much softer crumb.
Another trick is to use bread flour instead of all-purpose flour if you want a slightly chewier, more substantial roll that can hold up to heavy burger toppings.
For a professional presentation, you can sprinkle a tiny pinch of flaky sea salt over the buttered tops. The contrast between the salt and the sweet bread is incredible. If you are serving these as part of a tropical meal, you can even add a teaspoon of orange zest to the dough during the mixing stage to brighten up the citrus notes.
Common Pitfalls
The most frequent issue is the temperature of the liquid. If your milk and juice are too hot, you will kill the yeast and the dough will never rise. Always use a thermometer if you are unsure. Another problem is rushing the rise times.
Yeast works on its own schedule. If your house is cold, it might take two hours for the dough to double. Do not move on to the next step until the dough has actually grown in size.
Finally, avoid adding too much flour during the kneading process. It is tempting to keep adding flour if the dough feels sticky, but a tacky dough is a good sign. Every extra tablespoon of flour you add makes the rolls a little bit heavier. Use a light touch and trust the process.
Why Do These Rolls Use Pineapple Juice?
Pineapple juice is the secret ingredient that gives Hawaiian rolls their signature flavor and texture. Historically, these rolls were influenced by Portuguese sweet bread, but the addition of local Hawaiian pineapple juice changed the chemistry of the dough.
The enzymes in the juice act as a natural tenderizer, which is why these rolls stay soft for longer than traditional dinner rolls. It also provides a subtle, fruity sweetness that balances the salt in sandwiches and sliders.
How Should I Store Homemade Rolls?
Because these rolls contain butter and milk, they should be stored in an airtight bag or container once they have cooled completely. They will stay fresh at room temperature for about three days. If you want to keep them longer, you can freeze them for up to three months.
To reheat, simply wrap the rolls in foil and place them in a 300°F oven for ten minutes. This revives the soft texture and makes them taste like they just came out of the oven for the first time.
Final Thoughts
Homemade Hawaiian rolls are a labor of love that results in a bread far superior to anything in a plastic bag.
By focusing on the temperature of your yeast and being patient with your rise times, you can create a top-notch side dish that will be the star of your dinner table. They are soft, sweet, and perfectly golden.
Keep your liquids warm, your flour light, and your oven ready. These simple rules are the key to a successful bake. It is a tropical, comforting treat that works for any meal.
Would you like me to show you how to make “Slow Cooker Pulled Pork” to serve inside these rolls, or would you prefer a recipe for “Honey Butter” to spread on top?
Ingredients
Method
- In a large bowl or the bowl of a stand mixer, combine your warmed pineapple juice and whole milk. The temperature is very important; it should feel like warm bath water.
- Whisk in the honey and the yeast. Let the mixture sit for about ten minutes until it becomes foamy and smells like fresh bread. Once you see that bubbling layer on top, whisk in your melted butter, egg, and vanilla extract.
- Start adding your flour one cup at a time, along with the sea salt. If you are using a stand mixer, use the dough hook attachment on a low speed. If you are mixing by hand, use a sturdy wooden spoon. You want to add just enough flour so that the dough pulls away from the sides of the bowl. It should still feel slightly tacky to the touch but not so sticky that it clings to your fingers.
- For a light and airy result, keep the dough as soft as possible. Once the dough has formed a ball, knead it for about five to seven minutes. If the dough springs back when you poke it with a finger, you know the gluten has developed correctly.
- Lightly grease a large bowl with oil or cooking spray. Place your dough ball inside and turn it over once so the top is coated in oil. Cover the bowl with a clean kitchen towel or plastic wrap. You need to let the dough rise until it has doubled in size, which usually takes about sixty to ninety minutes.
- Use a knife or a bench scraper to divide the dough into twelve equal pieces. To make them look like professional blog rolls, weigh each piece on a kitchen scale to ensure they are the exact same size.
- To shape each roll, tuck the edges of a dough piece underneath itself to create a smooth top. Roll the dough in a circular motion under the palm of your hand against the counter.
- Place the shaped rolls into a greased 9×13 inch baking pan, arranged in three rows of four. Cover the baking pan again and let the rolls rise for a second time. This stage is shorter, usually taking about forty-five to sixty minutes.
- While the rolls are rising, preheat your oven to 350°F. Slide the pan into the center rack of the oven. Bake the rolls for 20 to 25 minutes. As soon as you pull the pan out of the oven, brush the tops of the hot rolls with a tablespoon of melted butter.