Few things bring more joy than biting into a warm homemade donut. Whether fried to golden perfection or baked for a lighter twist, donuts are the kind of treat that instantly makes an ordinary day feel special.
I remember the first time I fried a batch at home—the smell alone was enough to make the whole house feel like a bakery. The best part? Donuts aren’t as intimidating as they seem. With a little patience and a few pantry staples, you can make a dozen that taste even better than the ones from your favorite shop.
Ingredients You’ll Need
For the dough:
- 3 cups all-purpose flour
- ¼ cup granulated sugar
- 2 ¼ teaspoons active dry yeast (1 packet)
- ½ teaspoon salt
- ¾ cup warm milk (about 110°F)
- 2 tablespoons unsalted butter, melted
- 1 large egg
For frying:
- Neutral oil (like canola or vegetable)
For topping:
- 1 cup powdered sugar (for glaze)
- 2 tablespoons milk (for glaze)
- Optional: cinnamon sugar, sprinkles, or melted chocolate
Why Donuts Feel Like Magic
Donuts hit that sweet spot between nostalgic and indulgent. They remind me of Sunday mornings when a box from the bakery would show up on the table, but making them at home adds something extra.
You control the flavors, you can glaze them however you like, and you get to eat them fresh—still warm, still soft, and impossibly good.
Mixing the Dough
In a small bowl, combine the warm milk, yeast, and a pinch of sugar. Let it sit for 5–10 minutes until foamy. This step wakes up the yeast and tells you it’s alive and ready to work.
In a large bowl, mix the flour, sugar, and salt. Add the foamy yeast mixture, melted butter, and egg. Stir until the dough comes together, then knead on a floured surface for about 5–6 minutes until smooth and elastic. If the dough feels too sticky, sprinkle in a little more flour; if it feels dry, add a splash of milk.
Letting the Dough Rise
Place the dough in a greased bowl, cover with a clean towel, and let it rise for 1–2 hours, or until doubled in size. This is where patience pays off—the longer rise builds flavor and gives your donuts that fluffy interior.
Shaping the Donuts
Once the dough has risen, punch it down and roll it out to about ½ inch thick. Use a round cutter (about 3 inches) to cut out circles, then use a smaller cutter (or the cap of a bottle) to cut out the holes. Place the shaped donuts on a baking sheet lined with parchment. Cover lightly and let them rise again for 30–40 minutes.
If you don’t have cutters, don’t worry—just shape them into rounds or twist ropes of dough into rings. They’ll still taste amazing.
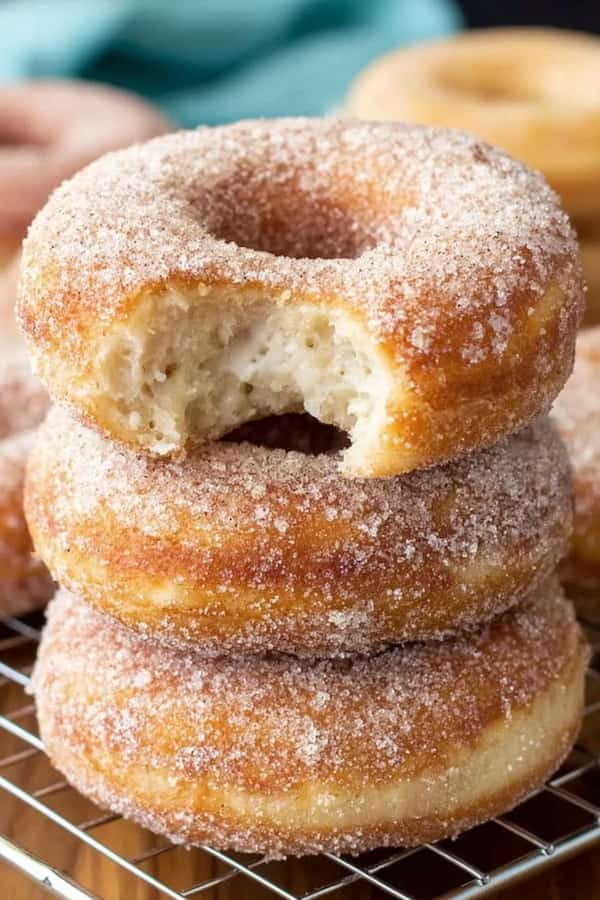
Frying to Golden Perfection
Heat about 2 inches of oil in a heavy pot to 350°F. Carefully lower in 2–3 donuts at a time and fry until golden brown, about 1 minute per side. Use a slotted spoon to transfer them to a paper towel-lined plate.
The smell of donuts frying is almost as good as the taste. Try not to eat them straight away, though—it’s worth the extra minute to add glaze or toppings.
Baking Option
If frying feels like too much, you can bake the donuts instead. Place them on a parchment-lined sheet and bake at 375°F for 8–10 minutes, until lightly golden. Baked donuts are softer and less indulgent but still delicious, especially with glaze or cinnamon sugar.
Making the Glaze
For a simple glaze, whisk powdered sugar with milk until smooth. Dip the warm donuts into the glaze, then set them on a rack so the glaze can drip and set. You can add sprinkles, chocolate drizzle, or even a dusting of cinnamon sugar while they’re still warm.
Variations Worth Trying
Donuts are endlessly customizable. Here are a few of my favorites:
- Cinnamon Sugar Donuts – Toss warm donuts in cinnamon sugar for a bakery-style classic.
- Chocolate Glazed Donuts – Stir cocoa powder into the glaze or dip in melted chocolate.
- Filled Donuts – Skip the hole and pipe in jam, custard, or cream after frying.
- Maple Donuts – Add maple extract to the glaze for a fall-inspired flavor.
- Baked Donut Rings – Use a donut pan for perfectly shaped baked versions.
Tips for Success
A few tricks help make your donuts foolproof. Always let the dough rise fully—it’s what gives you that light, fluffy texture. Keep an eye on the oil temperature when frying; too hot and they burn, too cool and they soak up oil.
Fry just a few at a time so you don’t crowd the pot. If baking, don’t overbake or they’ll turn dry. And finally, enjoy them fresh—donuts are at their best within hours of making.
Why You’ll Love This Recipe
These homemade donuts strike the perfect balance between approachable and impressive. You can fry them for that true bakery-style experience or bake them for a lighter, easier option. Either way, you’ll end up with soft, pillowy donuts that taste like a little celebration in every bite.
Once you try them, you’ll see why homemade always beats the box.