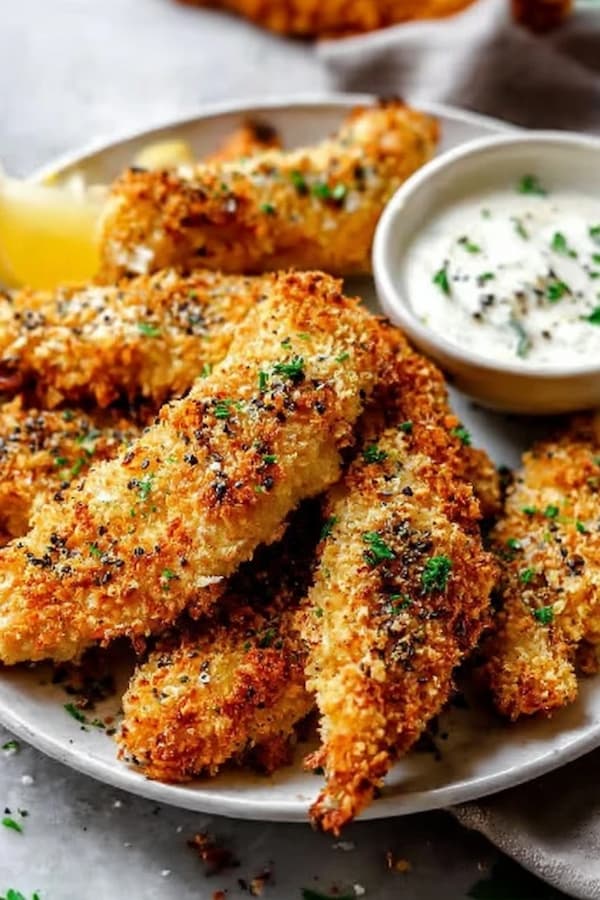
Crispy. Juicy. Easy. I started making oven-baked chicken tenders on nights when I wanted something quick but still homemade. The kind of dinner where you can mix ingredients in one bowl, coat the chicken, and let the oven do the rest.
And because they’re baked, you don’t get the heavy, greasy feel of deep-fried tenders.
These tenders come out crunchy, flavorful, and ready to dip in absolutely anything — ketchup, honey mustard, BBQ sauce, ranch, spicy mayo. They also reheat incredibly well, which is rare for breaded chicken.
Why Oven Tenders Can Be Just As Crispy
People often assume crispy chicken must be fried, but it’s not true. High heat and good coating technique can replicate that deep-fried crunch. The key is layering texture: flour for grip, egg for sticking, and breadcrumbs for crunch. When baked at the right temperature, the coating seals, the edges brown, and the chicken stays juicy.
This recipe works because it doesn’t rely on shortcuts. The tenders are coated in a mixture that balances crunch and flavor, baked hot enough to crisp but not so hot that the chicken dries out. And because everything is oven-baked, cleanup is easy.
Another reason these tenders shine is their versatility. You can turn them into wraps, salads, sandwiches, bowls, or enjoy them simply with your favorite dips. They’re family-friendly, fridge-friendly, and budget-friendly — a rare trio.
My First Oven-Tender “Breakthrough”
The first time I tried oven-baked chicken tenders, I was skeptical. I had attempted “healthy” versions before, and they always came out soft or pale. But one evening I changed two things: I coated the tenders twice, and I drizzled a little olive oil on top before baking.
The difference was dramatic. The tenders browned evenly, the crumbs crisped perfectly, and the chicken stayed moist inside. It was one of those kitchen moments where you immediately write the recipe down because you know it’s a keeper.
This version is built on that success — simple steps, reliable results, and that satisfying crunch you want from real tenders.
Ingredients
Serves 4
Chicken
- 1 ½ lbs (650 g) chicken tenders or sliced chicken breasts
- ¾ cup flour
- 1 cup panko breadcrumbs
- ½ cup regular breadcrumbs
- 1 teaspoon garlic powder
- 1 teaspoon paprika
- ½ teaspoon onion powder
- ½ teaspoon salt
- ½ teaspoon pepper
- 2 large eggs
Finishing
- 2 tablespoons olive oil (drizzle)
- Optional: grated parmesan, chili flakes, extra seasoning
Prep the Chicken
Pat the chicken tenders dry with paper towels. Dry chicken grips the coating better.
If using chicken breasts, slice them into long, thin strips.
Set Up the Stations
Prepare three bowls:
- Bowl 1: Flour, salt, pepper
- Bowl 2: Whisked eggs
- Bowl 3: Panko, breadcrumbs, garlic powder, paprika, onion powder
This setup ensures crisp, even coating.
Coat the Tenders
Dip each tender in the flour first. Shake off excess.
Then dunk into the egg mixture.
Finally press into the breadcrumb mix, coating all sides.
For the crispiest tenders, press firmly so the crumbs really attach.
Lay Them Out
Place the tenders on a parchment-lined baking sheet.
Leave space between each one — overcrowding prevents crisping.
Optional for extra crunch: lightly spray with cooking spray.
Add the Olive Oil
Drizzle or spray the olive oil lightly across the tenders.
This helps them get that golden, crispy texture without frying.
Bake
Bake at 220°C / 425°F for 18–22 minutes, flipping halfway through.
The tenders should be golden brown and cooked through (internal temperature 75°C / 165°F).
For extra crispiness, broil the last 1–2 minutes.
Serve Hot
Serve with your favorite dips:
- Honey mustard
- Ranch
- Spicy mayo
- BBQ sauce
- Garlic parmesan dip
- Sweet chili
They also pair beautifully with salads, fries, rice bowls, or roasted vegetables.
Why These Tenders Always Turn Out Crispy
Layered coating
The flour-egg-breadcrumb trio creates a durable crunchy shell.
Panko breadcrumbs
They create airy pockets that crisp beautifully.
High heat
Roasts the coating fast without drying the chicken.
Olive oil drizzle
Gives the tenders a fried look and taste.
Spacing on the pan
Allows heat to circulate around every tender.
Every detail works together to give you that classic “takeout tender” crunch — but healthier.
Variations You’ll Love
Parmesan Crusted – Add ½ cup grated parmesan to the breadcrumb mix.
Spicy Tenders – Add cayenne or chili powder.
Herb Crusted – Add Italian seasoning or dried parsley.
Gluten-Free – Use gluten-free breadcrumbs and oat flour.
Low-Carb – Skip the flour and breadcrumbs + use crushed pork rinds instead.
How to Serve Them
These tenders are incredibly versatile:
- In wraps
- On salads
- With mashed potatoes
- In rice or grain bowls
- As a meal prep protein
- With roasted veggies
- Inside sandwiches
They’re easy enough for weeknights but good enough for guests.
Storing and Reheating
Store leftovers in the fridge for up to 3 days.
For best results, reheat in:
- Air fryer: 3–4 minutes at 190°C / 375°F
- Oven: 8–10 minutes at 200°C / 400°F
Avoid microwaving — it softens the coating.
Freeze leftover cooked tenders for up to 2 months.
Why Are My Baked Chicken Tenders Not Crispy?
If your tenders aren’t getting crispy, they may be too crowded on the pan or not coated heavily enough. Adding a bit more breadcrumb mixture and ensuring the tenders have space helps the heat circulate properly. A light oil spray also boosts browning.
Can I Use Chicken Thighs Instead of Breasts?
Yes. Chicken thigh strips work wonderfully and stay very juicy. Just slice them into tenders and follow the same coating and baking method.
Final Thoughts
Crispy oven baked chicken tenders prove you don’t need a fryer to get that satisfying crunch. They’re easy, flavorful, and endlessly customizable. Once you try this homemade version, you’ll reach for it whenever you want a comforting meal that feels both fun and wholesome.
Meta Description (one sentence)
These crispy oven baked chicken tenders are golden, crunchy, and juicy inside, offering a healthier no-fry alternative that tastes better than takeout and works for any weeknight meal.