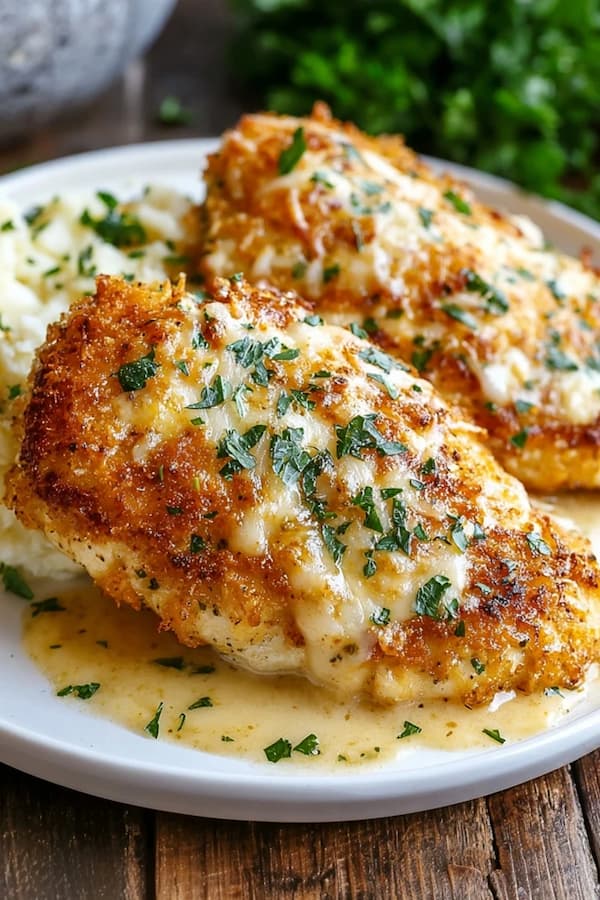
Some dinners just make everyone happy. Parmesan crusted chicken is one of those reliable, cozy meals that feels special without being complicated. It’s crispy, cheesy, and golden on the outside, and juicy on the inside.
Why This Chicken Gets So Crispy
The secret is a simple coating that sticks well and browns beautifully. Parmesan adds salty, nutty flavor and helps the crust crisp up. Breadcrumbs add crunch. A quick dip in egg keeps everything glued to the chicken so you don’t lose the coating in the pan.
This recipe is designed for real life: basic ingredients, no fancy equipment, and a method that works even if your chicken pieces aren’t perfectly uniform. You can pan-fry for maximum crispiness or bake for a lighter, hands-off version. I’ll walk you through both so you can choose what fits your day.
Ingredients
(Serves 4)
Chicken
- 2 large chicken breasts (about 600–700 g total), sliced in half lengthwise to make 4 cutlets
- 1 teaspoon salt
- ½ teaspoon black pepper
- ½ teaspoon garlic powder
- ½ teaspoon paprika (sweet or smoked)
Coating
- ½ cup all-purpose flour
- 2 large eggs
- 1 tablespoon Dijon mustard (optional, adds flavor and helps coating stick)
- ¾ cup grated Parmesan (finely grated works best for a tight crust)
- ¾ cup breadcrumbs (panko for extra crunch, or regular breadcrumbs)
- 1 teaspoon Italian seasoning (or dried oregano)
For Cooking
- 3–4 tablespoons olive oil (for pan-frying)
- 1–2 tablespoons butter (optional, for richer browning)
Turn Breasts into Cutlets
Place the chicken breasts on a cutting board. Using a sharp knife, slice each breast in half horizontally so you end up with 4 thinner cutlets.
Thinner cutlets cook faster and more evenly. They also stay juicier because you’re not waiting for the center to finish while the outside dries out. If your cutlets are still thick in spots, you can gently pound them to an even thickness using a rolling pin or the bottom of a pan.
Pat the chicken dry with paper towels. Dry chicken helps the seasonings stick and prevents the coating from sliding off later.
Season Like You Mean It
Sprinkle both sides of each cutlet with salt, pepper, garlic powder, and paprika.
This step matters more than people think because the crust is flavorful, but the chicken itself still needs seasoning. If you’ve ever had breaded chicken that tastes bland inside, it’s usually because the meat wasn’t seasoned well.
Set the chicken aside while you set up the coating station.
Set Up a Simple Coating Line
Grab three shallow bowls or plates:
- Bowl 1: flour
- Bowl 2: eggs (whisked) + Dijon mustard (if using)
- Bowl 3: Parmesan + breadcrumbs + Italian seasoning + parsley
Mix the Parmesan coating bowl well. You want the cheese and breadcrumbs evenly combined so every bite tastes balanced.
A small tip that helps: use one hand for dry bowls (flour and crumbs) and one hand for the egg bowl. It keeps your fingers from turning into breaded gloves.
Coat Each Cutlet the Right Way
Coat one piece of chicken at a time:
- Flour: Lightly dredge the chicken in flour, shake off excess.
- Egg: Dip into the egg mixture, let extra drip off.
- Parmesan mix: Press into the Parmesan-breadcrumb mixture firmly on both sides.
Pressing is important. Don’t just dust it—press it in so the crust sticks and forms a nice even layer.
Place the coated chicken on a plate. Repeat with the remaining cutlets.
Rest the Coated Chicken Briefly
Let the coated cutlets sit for 5–10 minutes before cooking.
This short rest helps the coating hydrate slightly and cling better during cooking. It’s a small step that makes a big difference, especially if you’ve had coating fall off in the pan before.
Use this time to heat your pan or preheat the oven (depending on the method you choose).
Oven-Baked (Less Hands-On)
If you prefer baking, preheat the oven to 200°C / 400°F.
Place a wire rack on a baking sheet if you have one (this helps air circulate and keeps the bottom crisp). Lightly spray or brush the rack with oil. Arrange chicken cutlets on top.
Bake for 18–22 minutes, flipping once halfway through. If you want extra browning, broil for 1–2 minutes at the end—watch closely so it doesn’t burn.
Baked chicken won’t be quite as crunchy as pan-fried, but it’s still delicious and easier for busy nights.
Pan-Fry Option
Heat a large skillet over medium heat. Add olive oil and (optional) a little butter.
When the oil is hot—shimmering but not smoking—add the chicken cutlets in a single layer. Don’t crowd the pan. If needed, cook in batches.
Cook for about 4–5 minutes per side, depending on thickness, until the crust is golden brown and the chicken is cooked through.
You’re looking for:
- Deep golden color
- Crisp crust
- Juices running clear
- Chicken no longer pink in the center
Transfer cooked cutlets to a plate lined with paper towels or a wire rack. A wire rack keeps the crust crisp while you finish the rest.
Lemon Finish and Serving
Right before serving, squeeze a little lemon juice over the chicken.
This is my favorite finishing touch because Parmesan and lemon love each other. The lemon cuts the richness and makes the flavor feel brighter, almost lighter—even though it’s still crispy, cheesy chicken.
Serve with:
- Roasted potatoes or air fryer fries
- Simple salad with a lemon vinaigrette
- Steamed broccoli or green beans
- Pasta with a light tomato sauce or olive oil and garlic
If you’re serving kids or picky eaters, this chicken is also great sliced and tucked into wraps or sandwiches.
How to Keep It Juicy
The best way to avoid dry chicken is to not overcook it. Thin cutlets help a lot because they cook quickly and evenly.
A few extra tips:
- Keep heat at medium (too high burns the crust before the inside is done).
- Don’t keep flipping—let each side cook until it naturally releases.
- Rest the chicken 3–5 minutes after cooking so juices redistribute.
If you do those three things, you’ll get that perfect combination: crisp outside, tender inside.
Storage and Reheating
Store leftovers in an airtight container in the fridge for up to 3 days.
For best reheating:
- Oven: 180°C / 350°F for 10–12 minutes
- Air fryer: 175°C / 345°F for 4–6 minutes
Microwaving works in a pinch but softens the crust. If you want crunch, use oven or air fryer.
Can I Use Chicken Thighs Instead of Breasts?
Yes. Boneless, skinless thighs work well and stay naturally juicy. Trim any excess fat and flatten them slightly for even cooking. The cook time may be a little longer depending on thickness, but the method stays the same. Thighs also pair beautifully with the Parmesan crust because their richer flavor stands up to the cheese.
Why Did My Coating Fall Off?
Usually it comes down to one of these:
- Chicken was wet (pat it dry first).
- Too much flour left on the chicken (shake off excess).
- Oil wasn’t hot enough (coating absorbs oil and slips).
- You moved it too soon (let it cook until it releases naturally).
A short 5–10 minute rest after coating also helps the crust set before cooking.